Opening Framing: A Framework for Thinking
The OSI (Open Systems Interconnection) model divides network communication into seven layers. Each layer has a specific job, specific protocols, and specific vulnerabilities.
Security professionals use the OSI model to systematically analyze where attacks occur and where defenses should be placed. When you hear "Layer 7 attack" or "Layer 2 segmentation," you'll know exactly what that means.
This week, we'll walk through each layer from a security perspective—not just what it does, but how it's attacked and defended.
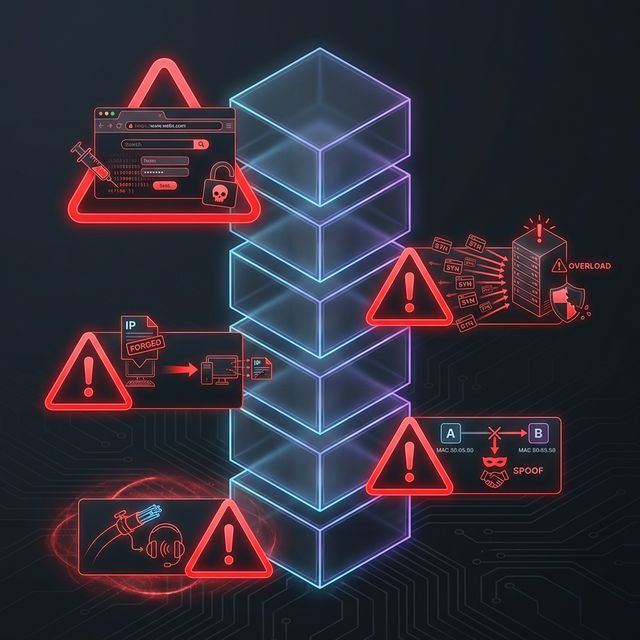
Key insight: Attacks can target any layer. A comprehensive defense requires security controls at multiple layers—defense in depth.
1) The Seven Layers Overview
Memorize this model—you'll reference it throughout your career:
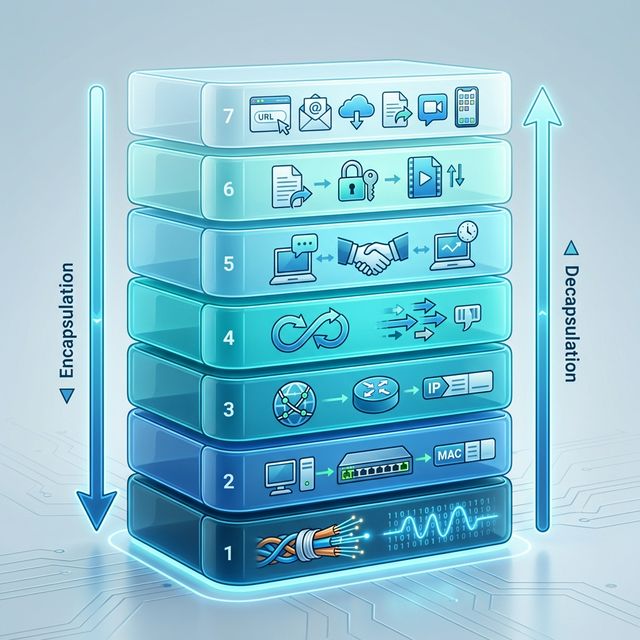
Layer 7: Application    - User-facing protocols (HTTP, DNS, SMTP)
Layer 6: Presentation   - Data formatting, encryption (SSL/TLS, JPEG)
Layer 5: Session        - Connection management (NetBIOS, RPC)
Layer 4: Transport      - End-to-end delivery (TCP, UDP)
Layer 3: Network        - Routing between networks (IP, ICMP)
Layer 2: Data Link      - Local network delivery (Ethernet, Wi-Fi)
Layer 1: Physical       - Bits on the wire (cables, signals)

Memory trick: "All People Seem To Need Data Processing"
(Application, Presentation, Session, Transport, Network, Data Link, Physical)
How Data Flows:
When you send data, it travels down the layers, getting wrapped in headers at each level (encapsulation). When received, it travels up, with each layer stripping its header (decapsulation):
Sending (encapsulation):
[Application Data]
[L6 Header][Application Data]
[L5 Header][L6][Data]
[TCP Header][L5][L6][Data]
[IP Header][TCP][L5][L6][Data]
[Ethernet Header][IP][TCP][Data][Ethernet Trailer]
→ Bits on wire

Receiving (decapsulation):
← Bits arrive
Strip Ethernet → Read IP → Strip IP → Read TCP → Strip TCP → Application Data
Key insight: Each layer only understands its own headers. This is why a firewall reading Layer 4 (ports) can't see Layer 7 (HTTP content) without deep packet inspection.
2) Physical & Data Link Layers (1-2): Local Attacks
Layer 1 - Physical:
The physical layer is about actual transmission: electrical signals, fiber optics, radio waves. Security at this layer is physical security.
Layer 1 Threats:
- Wiretapping: Physical access to cables
- Jamming: Disrupting wireless signals
- Physical destruction: Cutting cables, damaging equipment
- Rogue devices: Unauthorized hardware connections
Layer 2 - Data Link:
Layer 2 handles communication within a local network using MAC addresses. Ethernet and Wi-Fi operate here.
Layer 2 Threats:
- ARP Spoofing: Poisoning ARP caches to redirect traffic
- MAC Flooding: Overwhelming switch tables
- VLAN Hopping: Escaping network segmentation
- Rogue Access Points: Fake Wi-Fi networks
# ARP spoofing attack concept (attacker claims to be gateway)
Victim's ARP cache before attack:
  192.168.1.1 → AA:BB:CC:DD:EE:FF (real gateway)

After ARP poison:
  192.168.1.1 → 11:22:33:44:55:66 (attacker's MAC)

Result: Victim sends all traffic to attacker
Layer 2 Defenses:
- Port security (limit MACs per port)
- Dynamic ARP Inspection (DAI)
- 802.1X authentication
- Private VLANs
Key insight: Layer 2 attacks require local network access. If an attacker is on your LAN, they can do serious damage before touching Layer 3+.
3) Network Layer (3): Routing and IP
Layer 3 handles routing between networks using IP addresses. This is where the Internet operates—packets crossing routers to reach destinations.
Key Layer 3 Protocols:
- IP (IPv4/IPv6): Addressing and routing
- ICMP: Network diagnostics (ping, traceroute)
- IPsec: Encrypted IP tunnels (VPNs)
- Routing protocols: BGP, OSPF, RIP
Layer 3 Threats:
- IP Spoofing: Forging source IP addresses
- Route Hijacking: BGP attacks redirecting traffic
- ICMP Attacks: Ping floods, Smurf attacks
- Fragmentation Attacks: Exploiting reassembly
# IP header fields attackers manipulate:
┌─────────────────────────────────────────┐
│ Version │ IHL │ ToS │ Total Length      │
├─────────────────────────────────────────┤
│ Identification │ Flags │ Fragment Offset│
├─────────────────────────────────────────┤
│ TTL │ Protocol │ Header Checksum        │
├─────────────────────────────────────────┤
│ Source IP Address (can be spoofed!)     │
├─────────────────────────────────────────┤
│ Destination IP Address                  │
└─────────────────────────────────────────┘
Layer 3 Defenses:
- Ingress/egress filtering (block spoofed IPs)
- ACLs on routers
- IPsec for authentication and encryption
- BGP security (RPKI, route filtering)
Key insight: Layer 3 is where firewalls traditionally operate—permit or deny based on IP addresses. But IP addresses can be spoofed.
4) Transport Layer (4): TCP and UDP
Layer 4 provides end-to-end communication between applications using ports. TCP provides reliable, ordered delivery; UDP provides fast, connectionless delivery.
TCP vs UDP:
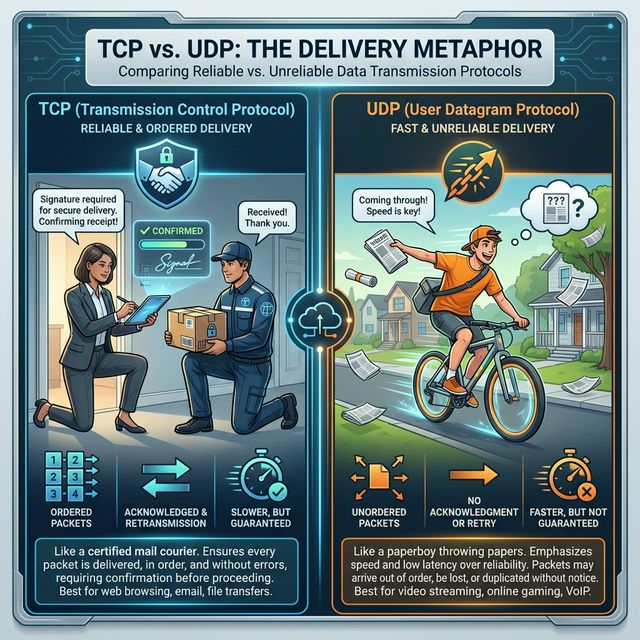
TCP (Transmission Control Protocol):
- Connection-oriented (3-way handshake)
- Reliable delivery (acknowledgments, retransmission)
- Ordered packets (sequence numbers)
- Flow control and congestion control
- Used by: HTTP, SSH, FTP, SMTP

UDP (User Datagram Protocol):
- Connectionless (fire and forget)
- No delivery guarantee
- No ordering
- Lower overhead, faster
- Used by: DNS, DHCP, VoIP, streaming, gaming
The TCP Three-Way Handshake:
Client              Server
  │                    │
  │───── SYN ─────────>│  "I want to connect"
  │                    │
  │<──── SYN-ACK ──────│  "OK, acknowledged"
  │                    │
  │───── ACK ─────────>│  "Connection established"
  │                    │
  │<════ DATA ════════>│  Communication begins
Layer 4 Threats:
- SYN Flood: Exhausting connection tables with half-open connections
- Port Scanning: Discovering services by probing ports
- Session Hijacking: Predicting sequence numbers
- UDP Amplification: DDoS using UDP protocols
Layer 4 Defenses:
- SYN cookies (stateless SYN flood protection)
- Stateful firewalls (track connection state)
- Rate limiting
- Port knocking
Key insight: Port numbers identify services. Port 22 = SSH, Port 443 = HTTPS. Firewalls use ports for access control, but ports can be changed.
5) Upper Layers (5-7): Sessions, Presentation, Application
Layer 5 - Session:
Manages sessions between applications. In practice, this layer is often merged with others in TCP/IP. Think of authentication sessions, RPC calls.
Layer 5 Threats: Session hijacking, session fixation, replay attacks.
Layer 6 - Presentation:
Handles data formatting, encryption, and compression. SSL/TLS operates here, as do data formats like JPEG, ASCII, encryption.
Layer 6 Threats: SSL stripping, downgrade attacks, malformed data exploits.
Layer 7 - Application:
User-facing protocols: HTTP, DNS, SMTP, FTP, SSH. This is where most attacks happen today because it's where applications live.
Layer 7 Threats:
- SQL Injection: Attacking through web forms
- Cross-Site Scripting: Injecting malicious scripts
- DNS Poisoning: Corrupting DNS responses
- Phishing: Social engineering via email
- Application DDoS: Overwhelming specific endpoints
Layer 7 Defenses:
- Web Application Firewalls (WAF)
- Input validation
- DNSSEC
- Email security (SPF, DKIM, DMARC)
- Application-aware proxies
Key insight: Layer 7 attacks bypass traditional firewalls because they use allowed ports (80, 443). You need application-layer inspection.
Real-World Context: OSI in Security Operations
The OSI model guides security architecture:
Defense in Depth: Don't rely on one layer. A good architecture has physical security (L1), port security (L2), firewalls (L3-4), and WAFs (L7). If one layer fails, others catch the attack.
Attack Classification: When analyzing an attack, identifying the layer helps choose the response. A SYN flood (L4) needs different mitigation than SQL injection (L7).
Tool Selection: Different tools operate at different layers. Wireshark sees L2-7, traditional firewalls see L3-4, WAFs see L7. Know what your tools can and can't see.
MITRE ATT&CK Reference:
- T1557 - Adversary-in-the-Middle: L2 ARP spoofing, L7 proxy attacks
- T1499 - Endpoint Denial of Service: L4 SYN floods, L7 application attacks
- T1071 - Application Layer Protocol: L7 C2 over HTTP/DNS
Key insight: Real attacks often span multiple layers. Understanding the OSI model helps you trace the complete attack chain.
Guided Lab: Identifying Layers in Wireshark
Let's examine real packets and identify each OSI layer in Wireshark.
Step 1: Capture Web Traffic
# Start capture on your interface
sudo tcpdump -i eth0 -w osi_lab.pcap &

# Generate HTTP traffic (not HTTPS for visibility)
curl http://example.com

# Stop capture
sudo killall tcpdump
Step 2: Open in Wireshark
wireshark osi_lab.pcapStep 3: Examine Layer Structure
Click on an HTTP packet and expand each section in the packet details pane:
Frame (Physical/Data Link info)
├── Ethernet II (Layer 2)
│   ├── Source MAC: xx:xx:xx:xx:xx:xx
│   └── Destination MAC: xx:xx:xx:xx:xx:xx
│
├── Internet Protocol Version 4 (Layer 3)
│   ├── Source IP: 192.168.x.x
│   ├── Destination IP: 93.184.216.34
│   └── TTL: 64
│
├── Transmission Control Protocol (Layer 4)
│   ├── Source Port: 52431
│   ├── Destination Port: 80
│   ├── Sequence Number
│   └── Flags: [SYN, ACK, PSH, etc.]
│
└── Hypertext Transfer Protocol (Layer 7)
    ├── GET / HTTP/1.1
    ├── Host: example.com
    └── User-Agent: curl/7.x
Step 4: Find TCP Handshake
Filter for the handshake:
tcp.flags.syn == 1 || tcp.flags.ack == 1Identify the three packets: SYN → SYN-ACK → ACK
Step 5: Compare TCP vs UDP
# Generate DNS traffic (UDP)
nslookup example.com

# Filter in Wireshark
udp.port == 53
Note: DNS uses UDP - no handshake, just query and response.
Step 6: Reflection (mandatory)
- How many bytes does each layer add to the packet?
- What happens to the TTL field as packets traverse routers?
- Why can you see HTTP content but not HTTPS content in Wireshark?
- At which layer would a WAF inspect traffic?
Week 2 Outcome Check
By the end of this week, you should be able to:
- Name and describe all seven OSI layers
- Identify which layer a protocol operates at
- Explain encapsulation and decapsulation
- Describe attacks specific to each layer
- Match security controls to appropriate layers
- Identify OSI layers in Wireshark packet details
Next week: TCP/IP Deep Dive—the practical protocol stack that powers the Internet.
🎯 Hands-On Labs (Free & Essential)
Map the OSI model to real protocols and traffic before moving to reading resources.
🎮 TryHackMe: Wireshark 101 (Layer Mapping)
What you'll do: Capture traffic and identify which OSI layers appear in packet headers.
Why it matters: The OSI model becomes real when you can point to each layer in a
packet capture.
Time estimate: 1.5-2 hours
📝 Lab Exercise: OSI Layer Protocol Map
Task: Create a one-page map that lists 3 protocols per OSI layer (e.g., DNS at Layer 7,
TLS at Layer 6).
Deliverable: A labeled table + short notes on one attack per layer.
Why it matters: This becomes your reference for where specific attacks and defenses
belong.
Time estimate: 45-60 minutes
🏁 PicoCTF Practice: General Skills (Network Basics)
What you'll do: Complete beginner challenges that involve netcat, sockets, and basic
network interaction.
Why it matters: Simple command-line networking builds confidence for deeper
protocol analysis.
Time estimate: 1-2 hours
💡 Lab Tip: When you see a packet field, ask yourself: which OSI layer created it?
Resources
Complete the required resources to build your foundation.
- Cloudflare - What is the OSI Model? · 20-30 min · 50 XP · Resource ID: csy104_w2_r1 (Required)
- Imperva - OSI Model and Security · 20-30 min · 50 XP · Resource ID: csy104_w2_r2 (Required)
- Wireshark Protocol Reference · Reference · 25 XP · Resource ID: csy104_w2_r3 (Optional)
Lab: Layer-by-Layer Attack Analysis
Goal: Analyze packet captures and identify what OSI layer each attack targets.
Linux/Windows Path (same for both)
- Download practice PCAPs from Malware Traffic Analysis or create your own:
# Generate ARP traffic (Layer 2) arping -c 5 192.168.1.1 # Generate ICMP traffic (Layer 3) ping -c 10 8.8.8.8 # Generate TCP SYN scan (Layer 4) nmap -sS -p 22,80,443 [target] # Generate HTTP traffic (Layer 7) curl http://example.com - Capture all traffic into a single PCAP file
- Open in Wireshark and create a table documenting:
- Packet number
- Protocol
- OSI Layer(s) involved
- Security relevance
- For each traffic type, explain:
- What security control would detect/prevent this?
- At what layer does that control operate?
Deliverable (submit):
- Your PCAP file
- Table of packets with layer classification
- Analysis of security controls per layer
- One paragraph: Why is defense in depth important?
Checkpoint Questions
- List the seven OSI layers from bottom to top.
- At which layer do MAC addresses operate?
- What is the difference between TCP and UDP?
- Which layer does ARP spoofing attack?
- Why can a Layer 3 firewall not stop SQL injection?
- What is encapsulation in networking?
Weekly Reflection
Reflection Prompt (200-300 words):
This week you learned the OSI model as a security framework. Each layer has its own protocols, vulnerabilities, and defenses.
Reflect on these questions:
- Before learning the OSI model, how did you think about where attacks happen? How has that changed?
- Why do you think Layer 7 attacks are becoming more common while lower-layer attacks remain relevant?
- Think of a security product you've heard of (firewall, WAF, IDS). At which OSI layer(s) does it operate?
- How does understanding layers help you design better security?
A strong reflection will connect the theoretical OSI model to practical security decision-making.
Verified Resources & Videos
- OSI Deep Dive: NetworkWorld - OSI Model Explained
- Layer 2 Attacks: MITRE ATT&CK - ARP Cache Poisoning
- Defense in Depth: CISA - Defense in Depth Guide
The OSI model is your mental framework for network security. When analyzing any attack or defense, ask "what layer?" This week's foundation will be referenced throughout the rest of this course. Next week: diving deep into TCP/IP—the real-world protocol stack.